Hot cross buns and happy Easter


It's Easter. Therefore it seems a fitting time to post about the hot cross buns I made a few days ago. I've been quite late with them this year - normally as soon as I return home for the holidays, I get out the flour, yeast, milk, dried fruit and spices. Better late than never, though, and I will be enjoying one of these delicious creations today, split, toasted and spread with lashings of butter. I think hot cross buns incorporate many of my favourite things: a doughy texture, a sweet crust, dried fruit, liberal amounts of spice, and the potential to be toasted and buttered. Rather like a teacake, but somehow better and more interesting. I hate the insipid versions you can buy en masse at supermarkets at this time of year: no more complex than a white bread roll, but with a cross piped on top in order to guarantee it goes in your basket in the run up to Easter. A hot cross bun is not a white roll with a bit of fruit in and a cross on top; its culinary DNA is completely different. The dough is enriched with butter, milk and sometimes an egg in order to give it that rich, glorious density that marries so well with sweet, spicy adornments.


I used to make hot cross buns in the breadmaker, getting it to do all the hard work of mixing, kneading and incorporating the fruit for me. However, now that I have the KitchenAid, this wasn't necessary. I did do some of the work by hand, though: I started off by rubbing butter into flour, as you would for a crumble, and after I had used the dough hook to knead the flour, yeast, butter, spices and milk together I folded the fruit into the dough by hand.


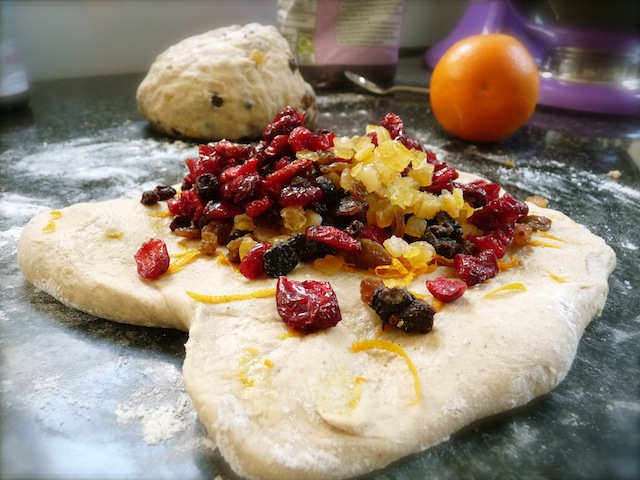
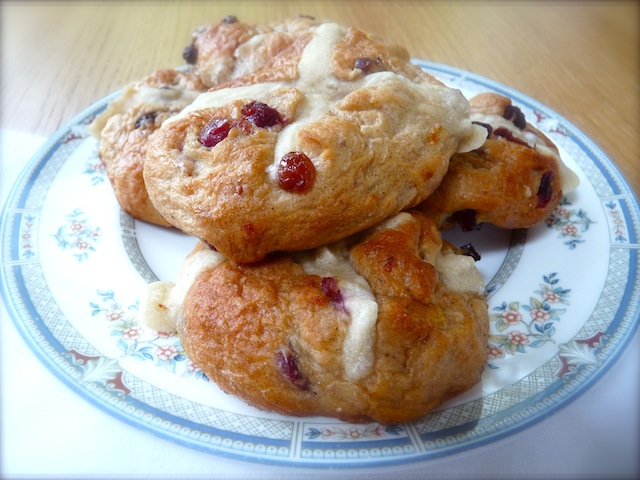
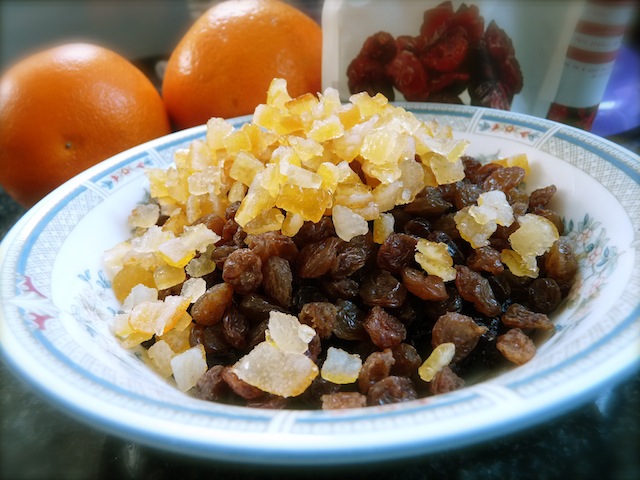
I've been reading articles on hot cross bun recipes over the last few weeks, and the general consensus is that you don't mess with the traditional dried fruit. There seems to be a particular aversion to using cranberries, for some reason. Naturally, I do love a good act of gastronomic rebellion, so I decided to make two batches of buns: one with the classic raisin, currant and mixed peel combination, and another using orange zest and cranberries. They're my hot cross buns and I will do what I like with them. Ever since I made cranberry stollen at Christmas, I can't get enough of these gorgeous, jewel-like dried berries. I also have a version including dried apple in the back of my mind for next year.


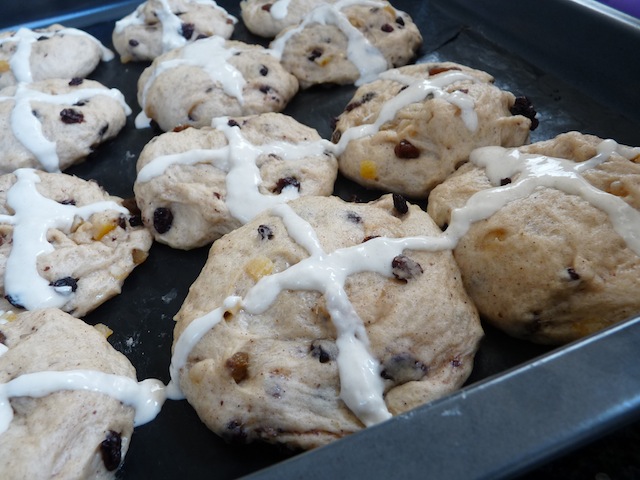
For these buns I decided to use fresh yeast, having recently discovered its miraculous qualities. It really does make a much lighter crumb and a dough that somehow feels much more alive. Some of my previous attempts at hot cross buns have been more like rock cakes, so I hoped that the inclusion of fresh yeast would give that delightful moist, spongy texture.


The dough was wonderful to work with: the smell of the spices and the rich texture from the butter and milk had me sitting there just inhaling the scent from the mixer bowl. Eventually I forced myself to start kneading the fruit in: the trick is to scatter it all over the stretched dough, fold it up to make a parcel, and then just keep kneading. Normally it can be quite tricky to keep all the fruit in, but because this is such a sticky dough I had no problems. I especially enjoyed grating the zest of an orange onto one batch of dough; the smell of the essential oils permeating the air as I kneaded was wonderful.


I let both doughs rise until doubled in size, which took a lot less time than I'd expected. I still can't get used to how quickly fresh yeast causes a dough to rise. Then I divided it into little balls, spaced them out on a baking tray, and let them rise again. For the crosses, I used a flour and water paste. I've seen recipes that call for fancy combinations of flour, yeast, water, oil and baking powder, but to be honest I think life's too short to faff around with the cross on a hot cross bun. After all, once it's smeared with butter and toasted, it doesn't really matter whether you used a simple mixture or a complex one.


It's true, you can buy many decent versions of hot cross buns. My favourite are the M&S ones, which have a wonderfully light texture and a really rich flavour. But if there's one incentive guaranteed to make you bake your own, it's the ensuing smell in your kitchen. The aroma of spices, fruit and butter will permeate every corner of your house, meaning that the wait for the buns to cool sufficiently so they can be eaten is agonising. I'm sure there has been many a burnt tongue over the years from eager cooks losing patience and devouring a just-baked bun.


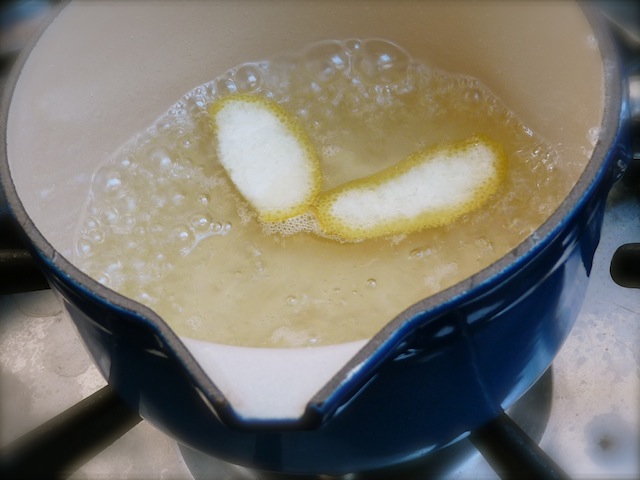
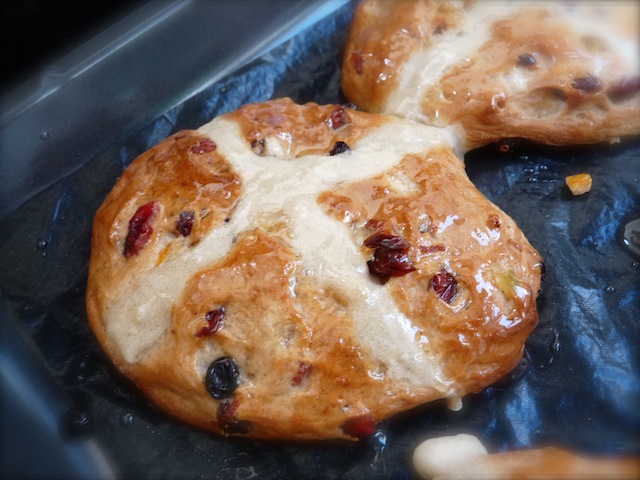
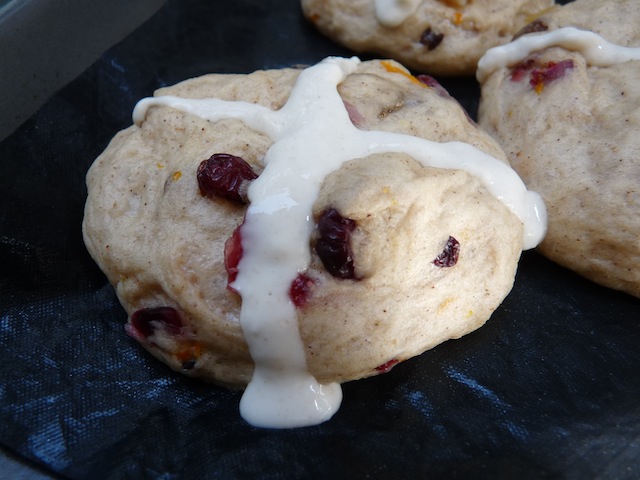
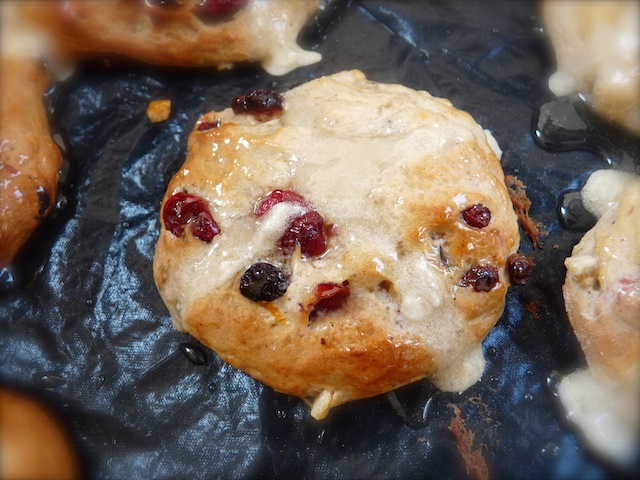
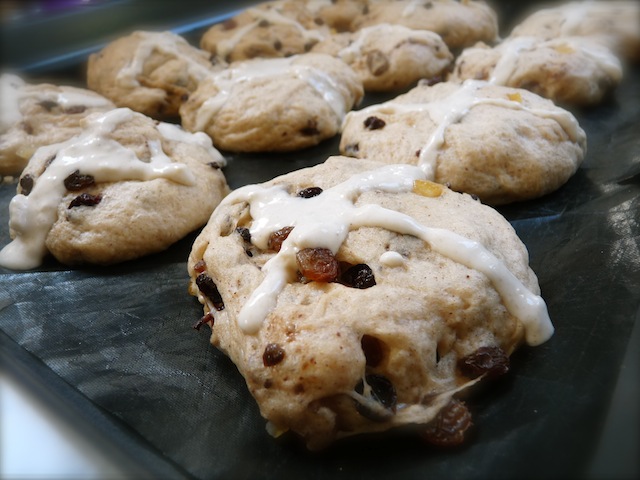
Finally, the all-important sugar glaze. This gives the buns a moist, sweet stickiness. This year I decided to jazz up the glaze a little by adding a couple of strips of lemon peel. It makes it slightly more fresh-tasting, which is a good balance for the sweet fruit and dough. I really enjoy brushing the hot syrup onto the golden buns, hot from the oven, poking it into every nook and cranny on the dough's dimpled surface. They then sit there in their own little pools of syrup until cool enough to eat, which - fortunately - only takes about five minutes.


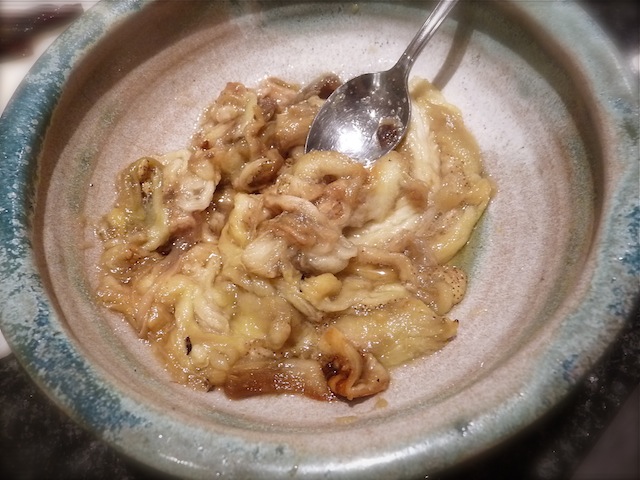
I am pleased with this recipe, although one thing I still haven't been able to master is getting the buns to rise to a sufficient height. They rose immensely with the fresh yeast, but outwards rather than upwards, resulting in quite a flat bun that isn't really big enough to split in half and toast. Not that they weren't delicious, pulled apart in a rustic, haphazard fashion and smeared with butter, but next time I might let the dough rise first and then cut it into squares before baking, instead of rolling it into little balls. This is, of course, a very minor aesthetic complaint. Otherwise, they're perfect. 

And, despite reports to the contrary, the orange and cranberry version is exceedingly good. In fact, I think I prefer it. Last year I went a bit mad and made a chocolate and orange version, which was incredible. I did feel a bit sacrilegious, introducing chocolate to the mix, but it was unfeasibly good. The chunks of chocolate melt when baked or toasted, giving a gorgeous cocoa stickiness to the bun, which, coupled with orange zest, resulted in a sort of hot cross bun slash jaffa cake taste sensation. Unorthodox, but wonderful. I suggest you try it.

Happy Easter!


Hot cross buns (makes about 20):

400g strong white bread flour
60g light brown sugar
1 tsp salt
1/2 tsp each of ground cloves, nutmeg, cinnamon and ginger
45g cold butter, cut into cubes
50g fresh yeast
130ml tepid water
70ml milk
Either 100g currants, 115g sultanas and 50g chopped mixed peel, OR for the orange and cranberry version, zest of 1 orange, 150g dried cranberries, 50g mixed peel and 50g sultanas
Flour and water, for the crosses
100g caster sugar
100ml water
2 strips lemon peel

Place the flour, sugar, salt and spice in a mixing bowl. Rub the butter in with your fingers, as you would a crumble, until the mixture resembles fine breadcrumbs.

Dissolve the yeast in the tepid water. Make a well in the centre of the flour mixture, then add the yeast mixture and the milk. Use an electric mixer with a dough hook to knead for 10 minutes, or do so by hand. It will be a very sticky dough, but avoid the temptation to add much more flour.

Spread the dough out on a work surface and scatter over the dried fruit. Pull the dough up around it to make a parcel, then continue to knead for a few minutes until the fruit is evenly distributed. Place the dough back in the mixing bowl, cover with cling film and leave to rise in a warm place until doubled in size (about an hour).

Knock the air out of the dough, then shape into small balls and place on a baking tray lined with baking paper - allow space for them to spread out. Leave again to rise until doubled in size.

Pre-heat the oven to 200C.

For the crosses, mix a little flour with a little water until you have a thick paste. Spoon into a plastic freezer bag, cut the corner off, and use this to pipe crosses over the top of the buns. Place in the oven and bake for 10-12 minutes, or until golden brown.

While the buns are baking, heat the water and sugar together until boiling, then add the lemon peel. Bubble for 10 minutes until thick and syrupy. When the buns are cooked, remove from the oven and immediately brush over the sugar glaze. Remove to a cooling rack.

Wait, if you can, for the buns to cool, then spread with butter and eat.

(Adapted from Lesley Wild, A Year of Family Recipes)

Adventures with a KitchenAid mixer #3: sticky rhubarb cake


I came back from Italy a few days ago to find an enormous bag of rhubarb in our kitchen. Enormous. There must be at least three kilos of the stuff in it. I will spare you my favourite spiel about how much I adore rhubarb and proceed to describe how I turned this back of green and pink stalks into one of the most delicious cakes in existence, with the help - naturally - of my beloved new KitchenAid stand mixer. Because this rhubarb is later in the season, it lacks the slender, elegant pinkness of its champagne cousin, and therefore isn't entirely suitable for a simple poaching or roasting treatment. This cake is a great and pleasantly rustic way to make the most of rhubarb that needs a little more doing to it than a simple scattering of sugar.


First, the cake batter. This is a simple mixture of brown sugar and butter, creamed together before adding yoghurt, eggs, ginger and self-raising flour. I was pretty generous with the ground ginger, because it goes so well with rhubarb and also with brown sugar. I've made this cake once before using sour cream instead of yoghurt, but I decided to try yoghurt because a) the sour cream I found in the fridge was interspersed with thick veins of furry blue mould and b) because yoghurt is a rather healthier substitute and I am still feeling vast after my trip to Italia.


The result is a rather thick batter that smells and tastes incredible. I think it's the tartness of the yoghurt that, coupled with the brown sugar and ginger, provides the most wonderful balance between sweet and sour. It goes into a tin, and then it's time for the rhubarb. Of course, making the batter requires no more effort than putting things into the bowl of the KitchenAid and switching it on. I'm still getting used to having my cakes mixed in a fashion that requires no hands-on effort from me.


Having been spoiled by early season rhubarb, hacking my way through these rather thicker and tougher stems was a novelty. I nibbled a bit of one out of interest, and it was rather like eating a lemon. I quite like the way this kind of rhubarb is green in some places and pink in others; it's an unusual colour contrast and for some reason reminds me of sticks of rock. Though I have never eaten or in fact closely observed a stick of rock. I sliced the rhubarb into short lengths, and arranged it on top of the cake batter.


In retrospect, I think it would be better to slice the rhubarb into longer lengths and arrange them horizontally rather than vertically with the cut sides facing upwards. I was in the mood for making patterns, though, so I arranged the pieces in concentric circles, having a sneaking suspicion that when I removed the cake from the oven they wouldn't look nearly so neat. I was correct. The ends had sort of frazzled in the heat and it looked a bit dry. Fortunately, the next step is designed to rectify any such issues in the most delicious way imaginable.


Ginger syrup. Water, sugar and ground ginger boiled until sticky and fragrant. The perfect partner to tart rhubarb, the syrup goes over the top of the cake once it has had a while to cool. I made some holes in the cake before I poured it over, in the style of a lemon drizzle cake. There was a lot of syrup left over, even though I completely drenched the cake in it. It soaks into all the cracks between the rhubarb and the batter, leaving a gorgeous glistening finish and a superbly moist cake. It also seeps into the pieces of rhubarb, softening and sweetening their astringency.


I love the look of this cake; it's very rustic, with its scattering of rhubarb sticking up at odd angles, but also intensely inviting because of the way the syrup shines wickedly over the surface, hinting at promises of sugary goodness to come. Cut into it, and you're rewarded with an incredibly moist crumb with a slight sourness that balances perfectly with the rhubarb and lashings of sugar. The ginger also marries perfectly, preventing over-sweetness. The best part is the top layer where the syrup has soaked down into the cake. Words cannot express just how satisfying and simply delicious this is. Add some vanilla ice cream, and you have dessert heaven. It's best eaten warm but keeps well for a few days too.


Sticky rhubarb and ginger cake (makes a 22cm cake):

75g butter, softened
250g brown sugar (light or dark - I used light)
300ml natural yoghurt
2 eggs
2 tsp ground ginger
300g self-raising flour
400g rhubarb
100g caster sugar
1 tsp ground ginger

Pre-heat the oven to 180C. Grease and line a 22cm springform cake tin.

Cream the butter and sugar together using an electric mixer. Add the yoghurt, eggs and ginger, and mix well until combined. Fold in the flour - you should have a smooth but fairly stiff batter. Pour the batter into the cake tin.

Chop the rhubarb into short lengths and scatter over the top of the cake, as neatly or as messily as you like.

Place in the oven and bake for an hour and a half. If the top starts to brown too much, cover with foil. Remove and leave to cool.

Make the syrup by mixing the caster sugar and ginger with 100ml water. Bring to the boil and bubble until thickened and syrupy. Use a fork to poke some holes into the cake (try not to go all the way through to the bottom), then drizzle the syrup over.

Serve immediately with creme fraiche, yoghurt, or vanilla ice cream.


Pearl barley risotto with asparagus, quail eggs and parma ham


Here goes. Episode number something-or-other in the series of "Elly tries, yet again, to like asparagus". As I've mentioned before, I am not the biggest fan of those green spears that, come late spring, set most food-lovers' hearts ablaze with excitement. Yet I feel compelled to like asparagus, because it's one of those 'things' that any self-respecting gastronome should go mad for, along with the first rhubarb of the season, real English strawberries, and purple sprouting broccoli. I therefore feel it is my mission to devise recipes that will render the green stuff a little more palatable; I am usually put off by its bitterness and almost sour flavour (maybe there's something in my saliva that reacts badly with it - I know this is the reason a lot of people can't stand coriander). So when I saw the first spears of the season at the market the other day, I snapped them up (at vast expense - how is it that English-grown produce can be three times the price of stuff flown in from Spain?) and set about devising a way of making the most of such a widely-revered crop.


I can usually enjoy asparagus when coupled with something salty to offset its bitterness. Parma ham is a classic partner, and I also thought that the salty, savouriness of a risotto would provide the perfect blanket for the green spears. Quail eggs were not really essential to the dish, but I discovered a few days ago that Sainsburys sells them (I'd only ever seen them at the market before), and they are so lovely that I just had to include them. Besides, eggs and asparagus are another classic combination (although one that, alone, I find rather cloying).


I used pearl barley for this risotto, rather than rice, because I love its texture and nutty flavour, which I thought would balance well with the salty parma ham and eggs. I used the same technique as for a rice-based risotto, but stirred for about a million hours more. Barley takes longer than you'd think (or wish, when ravenous) to cook. My friend Ben (who has berated me on several occasions for never being mentioned on my blog, so I am now rectifying this situation) stood there harassing me in the manner of a small child in the back of a car: "Is it ready yet? Is it ready now?"


I put some of the parma ham in the risotto towards the end of the cooking time, and the rest I dry-fried in a pan until it became crispy and I could crumble it over the risotto. I hard-boiled the quail eggs and used them as a garnish. I was annoyed that I overcooked them, because I wanted them soft-boiled, but I am writing this two weeks later, having had soft-boiled quail eggs yesterday, and I now know that they are nigh on impossible to peel when soft-boiled, so maybe the extra cooking time was a good thing.


I wanted to make the most of the expensive asparagus in the risotto, so I used every bit of the stem: the tough end of the stalks went in with the stock to add extra flavour; the base of the stalk I sliced finely and stirred into the onions at the beginning of the cooking time, and the fragile tips went into the mixture towards the end of cooking, so they softened in the heat of the final ladleful of stock. Some grated parmesan, black pepper, and that was it. Actually it didn't even need parmesan; it was salty enough from the stock and the ham.


The verdict? Very enjoyable. In fact, it was delicious. The combination of barley, stock, salty ham and tiny eggs transforms asparagus into something superb. It would work well with normal risotto rice, as well, and bacon instead of parma ham. The eggs are optional, but I just love the look of them perched atop a mound of glistening creamy rice. Be warned that they are possibly the biggest faff in the world to peel; start at least ten minutes before you want to eat them.


I think Ben also enjoyed it. I hope the mention of him here will make up for the countless times I have omitted his name in descriptions of dinners I've cooked for him. He provides excellent risotto-stirring entertainment by regaling me with his entrepreneurial ideas for iPhone-related gadgets...but I will say no more, because he's certain one such idea will be the making of his millionaire future, and I wouldn't want to spoil that for him by giving the idea away.

What I will give away, however, is the recipe for this risotto. Because it was very tasty and I think will win over any fellow asparagus-sceptics - are there any of you out there?! I sometimes I feel I am the only one...


Pearl barley risotto with asparagus, quail eggs and parma ham (serves 4):

1 large onion, finely chopped
3 cloves garlic, finely chopped
A bundle of asparagus
Olive oil
Butter
350g pearl barley (or risotto rice, in which case cook for less time)
A glass of white wine
2 litres chicken stock
Parma ham (quantities are up to you - I used about 8 slices)
12 quail eggs
Parmesan, to serve
Chives, lemon thyme or parsley, finely chopped (or all three)

Bring the stock to the boil in a saucepan. Snap the tough ends off the asparagus, and put them in the stock. Keep it at a gentle simmer.

Heat some olive oil in a pan and saute the onion and garlic until softened. Slice the asparagus stalks into thin rounds and add to the onion and garlic - reserve the tips for later. Add a knob of butter to the pan and leave to melt, then stir in the barley and coat in the butter.

Pour in the wine, and let bubble until it has been absorbed by the barley. Add the stock, a ladle at a time, stirring until it has all been absorbed before adding the next. This will take a good 40 minutes or more for barley, about 25 for rice. The barley should be soft but still a little bit nutty. You might not need all the stock, or you might need more, in which case use hot water if you run out. Don't add the tough asparagus ends along with the stock - they're just to add flavour.

Towards the end of cooking time, dry-fry half the parma ham in a frying pan until crispy, then remove to some kitchen paper. Stir the rest of the ham into the risotto, along with the asparagus tips. Taste and season. Stir in your choice of herbs - I used chives because they go so well with eggs and ham.

For the quail eggs, bring a pan of water to the boil. Drop in the eggs and cook for 2 minutes, then remove to a bowl of cold water. Peel and halve them.

To serve, place the risotto in bowls and crumble the crispy parma ham over the top. Garnish with the halved eggs. Serve with grated parmesan.

Walnut and juniper crusted venison loin with chocolate jus


This beautiful loin of Yorkshire venison has been sitting in my freezer for months. It seemed so special that I could never find an occasion good enough to defrost and cook it. I was also frightened of doing something bad to it and ruining what is one of the most wonderful ingredients I have ever used. The loin of venison is the prized cut: like beef fillet, it is tender, succulent, and beautiful. Overcooking it would be a culinary crime. I've only used it once before, to make a venison carpaccio with raspberry vinaigrette. I seared the loin, and then thinly sliced it to serve with a mixture of balsamic vinegar and crushed raspberries. I remember being delighted when my guests didn't finish it all, and the next day I feasted off sandwiches of thinly-sliced, rare deer. Carving rare meat is one of my favourite kitchen tasks; I love the incredible colour and texture of tender, pink flesh, particularly game. Finally I plucked up the courage to remove the venison from the freezer.


I had no fixed idea of what I wanted to do with it, so I made a mental list of all the things that work well with this meat: juniper, nuts, mash, chocolate, raspberries, bitter greens. I've seen Jerusalem artichokes around for ages now, and keep meaning to use them, so I decided I'd definitely include them in a mash to go with the venison. The rest just sort of happened in my head: I wanted some kale in there, because I love it, and because the dark, iron richness of greens goes well with game. I like the idea of encasing meat in a crispy crust, for textural interest, so I found a way there to incorporate walnuts and juniper. Finally, a chocolate and red wine jus.


Chocolate and venison is by now a well-established culinary connection. There's something about the cocoa richness of dark chocolate that really enhances the flavour of the meat. I just grated a little into a jus made from the pan juices of the venison loin, some beef stock, some red wine, and a sprig of thyme. Finally, I added a few raspberries, crushing them into the jus for a hint of piquancy to lift what is otherwise a very earthy dish. The chocolate adds a depth of flavour that you wouldn't expect; it's excellent.


For the venison, I seared the loin in a pan before rolling it in a mixture of crushed walnuts, crushed juniper berries, dried thyme and seasoning. It then went in the oven for ten minutes; the walnuts became crispy, and I left it to rest under foil while I finished the mash, greens and sauce. It sounds like a fairly complicated recipe, but it isn't really: the trick is getting all the elements finished at the same time.


I was really pleased with how it turned out. The meat was cooked exactly as I like it: very rare. Anything else would have been wrong with such a tender cut of meat. I was surprised at its moistness, too - game can often be very dry, even when left bloody. I sliced it into beautiful rounds, still with a few walnut crumbs clinging to them, placed them on the mash, and drizzled over the jus and raspberries. The sauce is absolutely wonderful: the beef stock gives it a richness that the chocolate then enhances, and it works so well with the texture of the meat. There are lots of very big, rich flavours going on, but they're balanced by the greens and the raspberries, and the slight sweetness of the rare meat. One to repeat, I think. If I could change one thing, I'd toast the walnuts first for extra crunch.


Juniper and walnut crusted venison loin with raspberry and chocolate sauce, Jerusalem artichoke mash, and kale (serves 4):

1 venison loin (about 600g)
A little olive oil
A handful of walnuts, toasted
6 juniper berries
1 tsp dried thyme
6 Jerusalem artichokes, peeled and halved
3 mashing potatoes, peeled and cut into large chunks
3 tbsp creme fraiche, cream, or butter, for the mash
Several large handfuls of curly kale
200ml red wine
200ml beef stock
Sprig of thyme
A bar of dark chocolate
A few raspberries (optional)
1 tsp balsamic vinegar

First, bring a pan of water to the boil and add the artichokes and potatoes. Simmer until tender. Pre-heat the oven to 180C.

Meanwhile, pulse the walnuts, juniper berries, dried thyme and some seasoning in a blender to make fine crumbs. Spread out on a plate. Get a frying pan very hot, add a little olive oil, then sear the venison loin on all sides. Roll it in the crumb mixture to coat all over, then place on a baking tray and put in the oven for 10 minutes (this is for rare - increase the timings a little if you like your meat more cooked, but beware of overcooking this very tender cut). When done, remove and cover with foil to rest for 10 minutes.

Pour the stock and red wine into the venison pan to deglaze. Add the sprig of thyme and simmer until reduced by half. Taste and check the seasoning, then add the balsamic. Strain into a jug, and just before serving, grate in some dark chocolate. How much is up to you - keep tasting. You don't want it to turn into chocolate sauce, but you can put a surprising amount in without overpowering the meat. Add the raspberries too, if you like.

Place the kale with 2 tbsp water in a large, microwaveable bowl, cover with clingfilm and microwave on full power for 3 minutes. Alternatively, steam using a steamer. Season and keep warm.

Drain the potatoes and artichokes and mash. Add creme fraiche, cream, butter and milk to taste, along with lots of salt and pepper.

To assemble, spread some mash on a plate. Slice the venison loin into slices about 1.5cm thick, and arrange on top. Spoon some kale onto the side, then finally drizzle over the chocolate jus.


Adventures with a KitchenAid mixer #1: simnel cake


If you haven't seen one of these before, where have you been living? The iconic design of the KitchenAid stand mixer means it is coveted by cooks everywhere. And probably also non-cooking hedonists whose lives are dominated by a search for the aesthetically pleasing. You can't deny that its gorgeous curves, sleek surface and beautiful colours are probably more of an incentive to purchase it than any skill it might have in actual mixing; however, style and substance unite in its ability to effect a huge variety of kitchen tasks while still looking fabulous - it's the Nigella Lawson of kitchen equipment. I'm lucky enough to possess one of these mixers at the moment, so I'll be putting it through its paces to see how it fares in my busy culinary lifestyle.


KitchenAid pride themselves on their stylish, durable and reliable mixer. It comes with three basic attachments: a wire whisk, a dough hook, and a beater. The former is for whipping fragile mixtures like egg whites; the dough hook for - obviously - bread doughs, and the beater for thicker, more sturdy mixtures like cake batters. However, should you wish to branch out, you can get all sorts of fancy attachments for it - a pasta maker, a sausage stuffer, a mincer, a citrus juicer, and an ice cream maker, to name but a few. It's pretty amazing what you can do with one piece of equipment. Especially when it's purple. My one is the 'grape' colour, but if you take a look at the website there are over 20 beautiful colours to choose from (my favourites are 'electric blue' and 'candy apple'). 


Now, it's all very well me saying this, but I can't really sing the praises of the mixer until I've tested it. Fortuitously, it's that time of year when I need to start thinking about making simnel cake, an Easter favourite in our house, replete with dried fruit, marzipan, and citrus flavours. I've made it for the last couple of years and decided to make it in good time this year to allow it to mature before Easter. I'm not very good at allowing baked goods to mature - I tend to eat them before they have half a chance - so it's probably a good thing I'm going to Italy on Saturday for a week; the poor simnel cake will be able to slumber, unmolested, in my kitchen, its sticky, sugary ingredients becoming acquainted and fusing together into a fruit-studded mass of Eastery goodness. Seeing as I declared the KitchenAid to be the Nigella Lawson of kitchen equipment, I decided to use a Nigella recipe to test it.


I used the beater attachment for this cake, because it's quite a thick mixture, especially once the fruit is added. Butter and sugar went into the mixing bowl, and within about a minute the mixer had beaten them to within an inch of their lives, forming a fluffy, creamy mass. I then incorporated the eggs, alternating with the dry ingredients (flour, baking powder, ground almonds, cinnamon, ginger). Finally, the fruit: glace cherries, sultanas, raisins, currants, mixed peel. One thing I would suggest is not to try cracking the eggs directly into the bowl while the mixer is on: you're guaranteed to drop half the shell in there too, which will be blitzed to a jagged paste before you can even utter a single word of profanity.


Ovoid disasters aside, I was very pleased with the mixer's performance. It's incredibly heavy, which also means it sits sturdily on the worktop and doesn't make huge amounts of noise as it mixes - far less noise than my electric whisk, which I'd normally use. One very minor criticism is that the lever you pull to change the speeds is rather stiff, and you can accidentally end up turning it off or right up when you only wanted to turn it down or up by a speed. But other than that, I have no complaints. I was worried that the beater might not be able to reach to the bottom of the mixing bowl (which, by the way, looks quite small but actually has a capacity large enough for most baking projects, at nearly five litres), leaving a residue of unmixed ingredients, but its unique planetary action (which sounds rather more exciting than it actually is, and had me eagerly expecting the mixer to launch into outer space and start orbiting Saturn) means that no part of the bowl is left unscraped.


The attachments are also very easy to attach and remove, as is the bowl, which makes for easy cleaning. It's definitely a piece of equipment that you'd want to sit on your worktop, rather than in a cupboard, largely because it's so heavy that you'd be built like a wrestler if you were trying to manoeuvre it every day. I think that's why they make so many lovely colours: you're guaranteed to find one that works with your kitchen decor.


I put half the cake mixture in its tin, and rolled out a circle of marzipan to cover it, before spreading the rest of the mixture on top. It then went in the oven. This delightful vein of almond paste in the centre of the cake adds moisture and flavour without being overpowering; it's not like the huge chunk of marzipan you find in stollen. I'm not sure who had the idea of putting sugary almond mixture in the middle of a cake, but it's a good one.


After the cake was baked and cooled, it was time to decorate it with more marzipan, and of course, the marzipan 'disciples' (minus Judas, because the culinary - and of course, religious - world is none too pleased with him). I like this part: rolling golden orbs of marzipan between one's hands, forming not-quite-perfect little spheres of sugar, is one of those therapeutic kitchen tasks that I love (along with making risotto, or rubbing butter into flour). I used an apricot glaze to stick the marzipan to the cake, and the disciples on top.


The next step is to score the surface of the cake with a sharp knife, and place it under the grill. This of course is optional, but I think the burnished surface of the marzipan (and, of course, the smell of toasting almonds and sugar) is wonderful. Two years ago I burnt it, so last year I used my cook's blowtorch, but as I hadn't brought the blowtorch home this year I had to use the grill again. I kept a very careful eye on it: it can turn from pleasant gold to carcinogenic black in a matter of seconds. I think this year I achieved just the right level of toastiness. I love the colours of the golden and brown top.


A very successful first outing for the KitchenAid, I think. Obviously I can't report on the simnel cake yet, because it has not matured. It will mature, I am determined, so I will have to let you know about it at a later date. I can't wait to try out the KitchenAid for other recipes, so watch this space. In the meantime, I will admit to standing in the kitchen and stroking the mixer lovingly, emitting sighs of culinary covetousness.


Simnel cake (makes a 20-22cm cake):


100g glacé cherries 
¼ teaspoon ground ginger 
500g mixed dried fruit 
25g ground almonds 
175g soft, unsalted butter (at room temperature)
3 eggs 
175g caster sugar 
2 tablespoons milk 
Zest of 1 lemon 
1kg yellow marzipan to decorate
225g plain flour icing sugar for rolling 
1 teaspoon baking powder 
1 tablespoon apricot jam, melted 
½ teaspoon ground cinnamon 


Take everything you need out of the fridge. Preheat the oven to 170C. Butter and line the bottom and sides of a 20cm or 22cm springform cake tin with baking paper. Chop the cherries very finely and add them to the rest of the fruit.
Cream the butter and sugar until very soft and light, and add the lemon zest. Measure the flour, baking powder, cinnamon, ginger and ground almonds into a bowl and stir to combine.
Add one of the eggs to the creamed butter and sugar with 2 tablespoons of the dry flour-and-spice ingredients, then beat in the remaining eggs in the same way. Beat in the rest of the dry ingredients, and then the milk. Finally fold in the fruit.
Dust a surface with a little icing sugar and then roll out about 400g of the marzipan. Cut it into a 23cm circle that will fit in the middle of the cake later. Spoon half of the fruit-cake mixture into the cake tin, smoothing it down with a rubber spatula, and then lay the marzipan circle on top of it. Spoon the rest of the mixture into the tin on top of the marzipan circle and smooth the top again. Bake for half an hour and then turn the oven down to 150C for another 1½ hours or until the cake has risen and is firm on top. Let it cool completely on a rack before you spring it open.
Unspring the cooled fruit cake, and unwrap the lining from the cake. Roll out another 400g circle of marzipan, paint the top of the cake with the melted apricot jam, and then stick it on.
Make 11 balls out of the remaining marzipan, roughly 2.5cm in size. Stick them around the cake using the apricot jam. Lightly score the centre of the marzipan in a criss-cross pattern with a sharp knife.
Preheat the grill to around 220C, and put the cake underneath it. Watch it carefully - you want it to be golden, but not dark brown. Remove, allow to cool, then leave to mature (if you can) for a few days or weeks before eating.
(By Nigella Lawson for The Times)


Bottled rhubarb


This week Rachel from The Crispy Cook is hosting Weekend Herb Blogging, and I've found an exciting new way of using one of my favourite ingredients.

There are some ingredients so beautiful and exciting that they always put a spring in my step on the journey back from the market to my kitchen. Blood oranges are one; really fresh, glistening mackerel is another; gorgeous jade-green, slightly squat Williams pears, with their promise of fragrant, sweet juice; dark aubergines, plump, glossy and black like beetle eyes. But probably my favourite is rhubarb. Spring rhubarb: bright, almost obscenely pink, poking out of my bag like sticks of rock. It's even better when the leaves are still attached: the contrasting bright green and pink is slightly mesmerising. I just love this vegetable, and am always looking for new ways to use it.


I'm also keen to use it while it's this lovely: as the season goes on, home-grown rhubarb turns tough, dark green, and woody. It needs a lot more sugar, and doesn't have the delicate flavour and colour that works so well in desserts. It's fine hidden under a thick, crumbly pastry crust or a buttery crumble topping, but isn't ideal for topping a snow-white pavlova or mixing into an orange roulade. A couple of weeks ago I bought a kilo of the pink stuff and put it in my freezer, to satisfy any rhubarb cravings that will inevitably arise over the coming months. But when I spied a heap of gorgeous, pale pastel rhubarb at the farmers' market the other day, and realised we have no more space in our freezer at home, I turned to another method of preservation: bottling.


I remembered an article in the Guardian a year or so ago about bottling rhubarb, and needed no further prompting, especially as we have a supply of these beautiful Le Parfait jars at home. I've preserved lemons in them before (great in Moroccan cooking), and they are just too pretty when filled with fruit to sit behind a cupboard door - my preserved lemons sit next to my bed on the windowsill. Ideal if I ever wanted a midnight snack of mouth-puckeringly sour, salty lemon flesh.


I've also bottled fresh apricots before - they are another ingredient I'm absolutely obsessed with when they're in season. I can't get enough of them: they go on my porridge (simmered into a thick, jammy compote with a cinnamon stick and some dates), on tarts, in pies and crumbles, all through the summer until they disappear and I'm left pining for them. They're one of the few fruits that you can't find all year round in England; unlike plums, they aren't imported all year, usually coming from France or further afield in the summer and then disappearing.


The technique for bottling fruit is simple: make a sugar syrup, then pack the fruit in the jars and pour it over. Then you have to vacuum-seal the jars (see below), but that's it. It is, in my opinion, a better method of preservation than jam-making, because the fruit retains its shape and flavour rather than collapsing into an overly sweet sticky mass. That said, I do love making my own jam and chutney as well, but I usually reserve it for things like apples that are in plentiful supply, rather than treasured rhubarb or apricots.


All I did for this was make a sugar syrup, cut the rhubarb into lengths and soak in the syrup overnight, then sterilise the jars (in the oven, though you can also do it in a pan of boiling water or a dishwasher), pack in the rhubarb, bring the syrup to the boil and pour it over. I then vacuum-sealed the jars by closing the lids, but not tightening the metal clasp, placing them in a low oven, and cooking for about 50 minutes before closing them. You can test the vacuum seal on this type of jar by unclasping the metal bit - if the lid stays tightly on, you know it's worked. To be honest, I'm not sure this step is essential - when I bottled apricots I didn't bother, and they were still delicious several months later when I came to eat them.


That's it, really: beautiful jars of gorgeous pink rhubarb, ready to extract and use in desserts and compotes whenever you fancy. I'm going to try and wait before opening my first jar, but we'll see how long that resolution lasts. I already have an exciting rhubarb cake in my mind. And how gorgeous do these jars look? They'll make a fine addition to my bedside windowsill, and a much better potential midnight snack than a preserved lemon...


Bottled rhubarb 

It's difficult to say how many jars this will fill. Your best bet is to sterilise several jars of different sizes, and use a combination to ensure the rhubarb is tightly packed. Mine filled a 1 litre jar and a 500ml jar. See the Guardian article for tips on sterilising and vacuum-sealing jars: this is the method I used, and it worked perfectly, but you can also use kilner jars. You can also double, triple, or halve the quantities as you wish.

1 kilo spring rhubarb, cut into short lengths
400ml water
180g caster sugar
Le Parfait jars (a total of about 1.5l capacity)

Place the sugar and water in a saucepan and bring to the boil. Bubble away for a few minutes, then pour over the rhubarb. Place in the fridge, covered, and leave to soak overnight.

Sterilise your jars by running them through a dishwasher, or washing in hot, soapy water then placing in the oven at 160C for ten minutes, or boiling for 10 minutes in a large pan. Make sure when you take them out of the oven/pan that you put them down on a chopping board or something - if they go on a cold surface they can crack. Sterilise the rubber rings from the jars by pouring boiling water over them.

Remove the rhubarb from the syrup and pack it tightly into the jars. Bring the syrup to the boil, and pour over the rhubarb so it just about covers it. If you don't have quite enough syrup, top up with boiling water fresh from the kettle.

Close the jars and replace the rubber seals but don't clip them down. Put the oven to 110C and place the jars on a baking sheet with some newspaper underneath in case the contents leak in the oven. Put in the oven and leave for 50 minutes. Remove and clip down the metal clips. Alternatively, you can clip the lids down and place the jars in a large pan lined with a teatowel to stop them moving around and breaking. Cover with water and bring to the boil; boil for a few minutes then turn off the heat and let the jars cool in the water.

The next day, unclip the metal. If the lid stays on and doesn't pop up, the seal has worked.


Moutabal with Iranian 'stone bread'


It's the trendy thing at the moment for chefs to be championing long-lost or neglected ingredients. The Great British Food Revival, currently showing on the BBC, is one of my new favourite programmes. Each week chefs or prominent food lovers like Gregg Wallace, Clarissa Dickson Wright, Michel Roux and the Hairy Bikers discuss a humble British ingredient that is in danger of being outshadowed by sexier foreign imports, or just dying out due to lack of interest: proper artisan bread, cauliflower, rare breed pork, the potato... I find it fascinating, and a very worthwhile endeavour, to try and do something about this sad decline. As someone who cooks a lot, and loves experimenting with new and exciting ingredients, I too have a list of foods that I am determined to reinvent for people; foods that a lot of people claim they don't like, but I believe this is only because they haven't had them cooked properly. Near the top of this list would be the aubergine.


The poor aubergine. When treated correctly, it can transcend the heights of vegetability to become something bordering on the sublime. However, I think many people are put off by the kind of aubergine you find in badly-made ratatouille or vegetable stews: spongy, still tough and fibrous in the middle, but soggy and slimy on the outside. While you can braise aubergine very successfully, as the Sicilians do in their famous caponata, in my opinion it is best roasted or grilled. Specifically, chargrilled over the smouldering embers of a barbecue, so it takes on the most incredible smoky flavour. Smoke and aubergine are a flavour pairing that to me is as natural as beef and horseradish, pork and apple, or tomato and basil. When you grill or roast an aubergine, the outer skin shrivels and pulls away from the flesh inside, so that when you take a sharp knife and slit it lengthways, it's almost like you're undressing it. Inside, it is soft and silky. It isn't much to look at - a rather unappetising brownish grey, and with a rather slimy appearance, but blended with the right ingredients, it is heavenly.


Middle Easterners know how to treat an aubergine. Their cuisine is resplendent with aubergine dishes, such as baba ganoush or moutabal: two delightful purées, both creamy yet sharp and garlicky, the latter including tahini which works incredibly well with the smoky aubergine. I ate it by the plateful in Syria, mopped up with thick flatbread. It's hard to describe the taste, but even aubergine-haters will be converted, I think, by its creamy, smoky, mysterious flavour. The two aubergines I found languishing in the vegetable drawer the other day were a blessing: they inspired me to recreate this incredible dish.


There are many ways to make moutabal, but I (vaguely) followed Ottolenghi's recipe from his Plenty cookbook. I roasted two aubergines in the oven until soft in the middle, then scooped out the flesh and mashed it with a fork. To this I added tahini paste, pomegranate molasses, a generous squeeze of lemon juice, a crushed garlic clove, lots of chopped parsley, some quartered cherry tomatoes (not traditional, but they turn it into more of a meal than a dip), salt and pepper, the seeds of half a pomegranate, and then my secret ingredient. Which isn't so secret, because I'm about to extol its wonders now. It's oak-smoked rapeseed oil. Rapeseed oil is pretty trendy with chefs at the moment: it has all sorts of health benefits, it has less saturated fat than olive oil, and a higher burning point, making it suitable for all sorts of frying. I picked up a couple of bottles at a farmers' market a few weeks ago, but it was the 'oak-smoked' variety that caught my eye. I tried a bit, and was hooked. The seller mentioned that it would be good with aubergines, and he wasn't wrong: using an oven, you can't quite get that chargrilled flavour in the aubergines as you could on a smoking griddle or a barbecue. A tablespoon of this oil, however, and you may as well have roasted them on hot coals.


To scoop up the aubergine goodness, I turned to my Iranian cookbook, Saraban, and tried out the recipe for sangak. This is an Iranian bread that is cooked on an oven with a floor of little pebbles, which give it a lovely dimpled surface. I was fascinated by the idea, though my mother drew the line at me going down to the pond and fetching some pebbles to bake on. Instead, I used a scattering of dried chickpeas and beans, which I normally use for baking blind pastry cases. Not quite as authentic, but the effect was the same: lots of little indentations in the bottom of the bread, while the top puffed up like pitta bread.


It's a delicious bread: the use of both white and wholemeal flour gives it a nutty, chewy texture. It's even better the next day, incidentally. Just right for scooping up huge mouthfuls of one of the most delicious mezze you're ever likely to sample. This is guaranteed to impress even those who claim to hate aubergine: it has none of that horrible spongy, slimy texture; just a wonderful combination of flavours that will delight and surprise.


Moutabal (makes enough for 2-3):


2 aubergines
3 tbsp tahini paste
2 tsp pomegranate molasses
1 tbsp lemon juice
1 crushed garlic clove
2 tbsp chopped parsley
2 handfuls cherry tomatoes, quartered
Seeds from half a pomegranate
Salt and pepper
Oak-smoked rapeseed oil (optional)

Turn the grill up to about 250C. Place the aubergines on a sheet of foil, prick lightly with a knife, and place under the grill. Turn them occasionally, until the skin has shrivelled and they are soft inside (about 20-30 minutes). Remove and leave to cool.

Slit open the skins and scoop out the aubergine flesh. Mash with a fork, and combine with the other ingredients. Taste as you go - the above is just a guideline and you might want more lemon juice or molasses depending on the balance of sweet-sour-smoky.


Stone bread (makes 6-8 flatbreads):

2 tsp dried yeast
180ml warm water
270g wholemeal flour
500g strong white bread flour
1 1/2 tbsp sea salt
300ml tepid water

Dissolve the yeast in the warm water for 10 minutes. Combine the flours and salt in an electric mixer with a dough hook. Stir the yeast mixture into the tepid water, then gradually work into the flour. Knead for 10-15 minutes on a slow speed (or by hand) until smooth and shiny. Transfer to a bowl, cover, and leave in a warm place to double in size (about 2 hours).

Preheat the oven to its highest temperature. Knock back the dough, then leave to prove for 20 minutes. Halfway through the cooking time, scatter some dried chickpeas or beans, or a lot of washed and oiled pebbles, over the base of a large baking tray. Heat until very hot.

Divide the dough into 6-8 portions and roll into thin oval shapes. Transfer to the baking tray and push firmly onto the pebbles. Bake for 5 minutes, until a rich golden brown (you can do this in batches if they won't all fit).


Dogfish tagine


How wonderfully exotic does 'dogfish tagine' sound? I spied some dogfish at the fishmongers the other day. Readers of this blog will know that most of my cooking generally begins with "I saw ___ at the butchers/fishmongers/market the other day", and this incident was no exception. Intrigued by its name and its appearance (it looked a bit like monkfish tail; thick, meaty white fillets with a large bone running through the back), I bought some immediately, with absolutely no idea of what I was going to do with it. I just liked the idea of serving up dogfish.


Dogfish, also known as huss or rock salmon, is a firm white fish that is popular in fish and chip shops. It's actually a small type of shark. I'm always interested in finding fish like this that will work in recipes where a meatier texture is required, like curries or stews. A fish curry sprung to mind, but was almost immediately replaced by the notion of a fish tagine, which is only natural given my intense affection for Moroccan food. Fish tagines are generally characterised by the flavours of tomato, spices, coriander, saffron, and lemon or orange, flavours that the beloved Spanish paella has in common.


I've made fish stews like bouillabaisse before, and I think I may have once made a fish tagine before, so I had a basic list of ingredients in my head. Orange (especially as I had some blood oranges sitting in the fruit bowl that were starting to cry out to be eaten), olives (they go so well with orange in fish dishes, as I found with my red gurnard with orange and olive risotto), fennel (I love the aniseed note of it with fish), spices (cinnamon, paprika, ginger, a little chilli, and that alluring Moroccan spice mix, ras-el-hanout, which contains rose petals for a delicious perfumed note), saffron (always crops up in fish dishes, as with bouillabaisse or paella) tomatoes, onions and garlic.


This recipe is easy - it's just a case of softening the vegetables, adding some stock and chopped tomatoes, then letting it simmer away to thicken before adding the fish, which only takes a couple of minutes to cook. Then I finished the dish with a sprinkling of toasted flaked almonds, the fronds reserved from the fennel bulb, and some chopped coriander and parsley (my knee-jerk garnish for all things Moroccan; I'm a coriander addict). It's delicious: the sauce is packed with warm flavours, a little heat from the chilli, and beautiful melting onions and crunchy pieces of fennel. The fish has enough texture to stand up to the sauce, and the toasted almonds provide the perfect crunch. For something that takes half an hour, this looks and tastes much more impressive. Serve atop a mound of couscous for very healthy-tasting but warming and delicious dinner. If you can't find dogfish, any other firm white fish (haddock, hake, pollack, even swordfish if you're feeling extravagant) would do.


Dogfish tagine (serves 4):

1kg firm white fish fillets
Pinch of saffron
800ml hot fish stock
Olive oil
2 onions, finely sliced
4 cloves garlic, finely chopped
1 tsp each cumin, paprika and ginger
1 tsp ras-el-hanout (optional)
Pinch chilli powder
400g tin chopped tomatoes
1 cinnamon stick
1 tbsp honey
Zest and juice of 2 oranges
1 fennel bulb, finely sliced and fronds reserved for garnish
75g pitted black olives
Big bunch coriander and flat leaf parsley
A handful of toasted flaked almonds
Couscous or saffron rice, to serve

Add the saffron threads to the stock and leave to infuse. Saute the onions and garlic until softened, then add the spices, cinnamon stick, tomatoes, honey, orange zest and juice, and stock. Bring to the boil and simmer, uncovered, for about 25 minutes until thickened. Add the fennel slices and simmer for a further 10 minutes until softened slightly.

Add the fish and cook for a couple of minutes on each side until it's cooked through. Stir in the olives and herbs, then ladle into bowls over couscous or rice and garnish with the toasted almonds and reserved fennel fronds.

The Magdalen Arms, Oxford

I've been wanting to go to the Magdalen Arms ever since I saw it reviewed in some of the major newspapers. My weekends aren't complete without the Saturday papers, but every time I read them my life is injected with a modicum of sadness. It's taunting, sitting there reading about some innovative and delightful new culinary establishment, getting all excited about how delicious the carpaccio of tuna or venison loin or rhubarb foam is, scanning to the end of the page, and discovering it's a) in London or b) unaffordable or c) both. Not that Oxford is a million miles from London, but it's not as if I could say "Ooh! That looks nice! I'll hop on the 2 hour bus to London for dinner". I've eventually, on scheduled trips to London, finally made it to a few of these places (Polpo, Bocca di Lupo), but imagine my delight when I saw the name of my own beloved place of residence at the end of a review one day.


My general impression from reviews of the Magdalen Arms (dodgy pub turned gastropub) is that it serves good, honest food, some of the best you'll find at an Oxford pub, but the service isn't great. The latter was definitely true. We waited nearly 40 minutes for our lunch. However, it was a Sunday, the pub was completely full, and desserts were very prompt to arrive, so I'm entitled to almost forgive that. Plus there's a complimentary bread basket while you wait. This slightly makes up for the hunger pangs, except not really, because the bread is so bloody good you'll just sit there staring at the empty basket, contemplating licking the butter. Unfortunately, you have to pay £3 for extra bread. I suspect they've done that because, as I mentioned, the bread is so DAMN FINE that if you were anything like me, you'd keep emptying the basket, allowing them to bring more and more and more, until you developed a crisp crust and started to smell of yeast.

So I just waited. And waited. And thought about the bread - which, by the way, is so superawesomely great - and watched other tables being brought more bread. I nearly went over and said, by the way, don't you think this bread is exceedingly spiffing? And then, just as I was about to make a mad leap for the bar to steal some more delightful leavened substance, plates arrived.

Between us, we had venison shank with quince, roast pork with apple sauce, and Hereford ox cheek with dumplings and horseradish mash. Three guesses as to which was mine. As one of my companions observed, "You love animal cheeks, don't you?" Although that said, I am a quince fanatic, so I bet you guessed the venison, didn't you, dear readers?

The first thing I will say is that presentation isn't brilliant. My dish looked rather like a road does when it has just been re-tarred, and there are bits remaining that have clumped together in the sun: the sauce was almost black, thick with vegetables and bay leaves (four of them! Did the chef make this underneath a moulting bay tree?), the dumplings were large and lumpy, and the ox cheek was essentially a huge mound of meat. The venison was also dark and covered in sauce, with some slices of poached quince on the side. But I feel it is silly to bemoan the lack of presentation skills, because as any Masterchef contestant knows, it is extremely hard to present stew in any kind of haute cuisine fashion. Stew is rustic; it isn't designed to be faffed about with and put into presentation rings and quenelled and topped with foam and micro-herbs. If the flavour is good, who cares? The only tiny thing I would criticise is the presentation of the roast pork: I think the kitchen had run out of large plates, because the whole thing (an enormous mound of mash, pork, and apple sauce) had about a centimetre of plate surrounding it. It looked untidy and thoughtless, as if they couldn't be bothered. Not what you'd expect when you're paying £16 for what is essentially a Sunday roast you could make at home.

However, the food was tasty. My ox cheek was braised to perfection, the meat melting and unctuous, though rather fatty and gelatinous in the middle (but I think this is more down to the cut of meat than the cooking). The sauce was thick and rich, the dumplings satisfying but light, and it was topped with some horseradish cream, which went very well and cut through the fattiness of the dish. I would have liked something green with it though, some cabbage, kale or broccoli: I'm just not enough of a carnivore to appreciate a huge, steaming plate of meat and dumplings. Especially when the meat in question is roughly the size of my face. Ox are LARGE. Larger than pigs. You heard it here first.

The venison I sampled a little of, and it was delicious. Quince and venison go perfectly together, and you need something fruity to combine with rich meat and sauce. Again, though, some vegetables wouldn't have gone amiss. The pork was very tasty, but rather fatty: not in a sexy, crackling sort of way, but in the sense that there was a huge rim of moist, white fat around the edge of the meat. Not particularly appetising. All in all, it was good food but rather unbalanced; it may have been because it was a gorgeous spring day, and sitting in a dark pub with huge plates of meat and mash seemed a little odd, but I would have liked some vegetables with the dishes. You can order them for extra money, but really, how much would it set them back to cook a few cabbages to go with the main courses? And incidentally, how much would it set them back to offer extra bread for free? I only say this, you understand, because the bread really is rather sumptuous.

Desserts were almost not on the cards, so full were we from our wintry fare. But I saw the words "pear", "almond", "tart" and "vanilla ice cream" in the same sentence on the menu, and suddenly my dessert stomach expanded. (It also expanded literally after eating said tart. In fact, it is still expanded, two weeks later). We also tried the sticky toffee pudding, which was immense. Now, I like this - better to be given too much dessert than too little. But it really was massive, and also tongue-searingly hot, and positively drowning in sauce. All of these are good things, provided you're not feeling full of ox. My pear tart had the most wonderful texture: really crisp and crumbly pastry on the outside, with a moist and melting almond filling. My only complaint is that the pears were tasteless; the tart was a little too blandly sweet, and needed something sharper to contrast. But texturally it was a delicious masterpiece.

We spent, all in all, a couple of hours or more sitting in the pub. It had a cosy feel and a good atmosphere, though also felt rather frenetic at first, but I'll put that down to it being Sunday lunchtime. The interior is half pub, half bistro, with dark wooden tables, daffodils in little vases, and nice espresso cups with salt and pepper in. I imagine it would be a very nice dinner destination, or good for a dark, gloomy day, but it was rather oppressive in there when there was glorious sunshine outside.

I believe they have two menus every day, one for lunch and one for dinner. There were lots of other delicious-sounding dishes on there, like wild rabbit with chorizo and white beans, or baked sea bream, or octopus salad. They also do lots of dishes that you can order to share, like a lamb shoulder or large pie. It's classic gastropub food, but with a modern twist, and using all sorts of interesting seasonal ingredients - in the shooting season I believe they do a lot of game, and when I went they had a tagliatelle with purple sprouting broccoli on the menu.

If I had to summarise, I'd say it was good, but not worth the prices. It's not outrageously expensive, with most starters £5-7, mains between £11 and £17 (for individuals - the sharing dishes are obviously more), and desserts about £6. But given the slow service, the average presentation and the unbalanced nature of some of the dishes, I wish I could have been a fiver or so better off. To be honest, I preferred my lunch at the Anchor in Oxford a few weeks ago - it's a bit cheaper, service is better, and the food was perfect. But I'm planning to go back to the Magdalen Arms in the evening, midweek, when I imagine it'll be less busy, so I can see if the service improves, and I'm also eager to sample more of the dishes. It's had amazing reviews in many places, so I'm hoping my experience was an average as opposed to a good day. Watch this space for an updated review.

Oh and I forgot to mention - the bread is great. Really great.

Rhubarb and orange roulade


I generally think of roulade as either a dessert for deepest winter or brightest summer. It appears at Christmas in its chocolate incarnation, the yule log. In my family it's an integral part of the Christmas dinner: Christmas pudding is far too heavy to follow the excesses of December the twenty-fifth, and is usually saved for Boxing Day, but my mum's chocolate and chestnut yule log is just the thing to counteract all that rich fare. The summer version usually involves some sort of red berry, along with softly whipped cream. I decided it was time to bring the roulade into springtime, using one of my favourite ingredients: early, shocking pink, tart-sweet rhubarb.


Rhubarb is too often buried underneath a mound of crumble or smothered in a pastry case. While rhubarb pie and crumble are both superb feats of culinary engineering in their own right, when rhubarb is this beautiful I think it deserves more of a starring role in a dessert. The colours of this roulade are just wonderful: soft, golden sponge; bright white cream with flecks of orange zest, and the teenage-girl pink of the rhubarb stalks.


It's a simple dessert to make. You start off by making a fatless sponge with eggs, sugar and flour, along with a drop of vanilla (this goes very well with rhubarb, as I discovered when making my rhubarb French toast). It goes in the oven for about ten minutes, spread onto a shallow baking tray, and then you turn it out onto a sheet of greaseproof (for ease of assembly) and leave to cool.


For the filling, I just roasted rhubarb as I always do - with the juice of an orange and a sprinkling of sugar, at 170C for about 20 minutes. I left it to cool, then spread the roulade with ricotta mixed with icing sugar and orange zest: healthier than mascarpone or cream, and with a delightful graininess to it that goes very well with the sponge and the tangy rhubarb.


The only tricky part is the assembly. The sponge will inevitably crack as you try and roll it up - I'm sure there are tricks to avoid this, but mine was having none of it. Lorraine Pascale suggests adding a little warm water to the mix before baking, but this didn't help. To be honest, I don't think it matters. I guess the key is to try and roll it as tightly as possible, but the outer layer normally looks quite smooth so it doesn't matter that much. Dust it with icing sugar and no one will even notice. Anyway, you're going to slice it and serve it as soon as possible, and it tastes delicious, so who cares about a few cracks?


Rhubarb and orange roulade (serves 4-5):

3 eggs
80g caster sugar
1 tsp vanilla extract
1 tbsp warm water
80g plain flour

180g ricotta cheese
5 tbsp icing sugar
Zest of an orange
Juice of an orange
4 stalks rhubarb
Sugar for the rhubarb

First, slice the rhubarb into short lengths and toss with the orange juice and about 5 tbsp caster sugar in a baking dish. Bake at 170C until the rhubarb is tender but still holds its shape. Remove and leave to cool. Leave the oven on for the sponge.

For the sponge, beat the eggs and sugar with the vanilla in a large bowl until pale and foamy. Fold in the warm water, then fold in the flour (sift it first). You want to incorporate the flour but not agitate the mixture too much to keep all the air in.

Grease and line a shallow swiss roll tin or baking tray (mine was about 20x30cm) with greaseproof paper. Spread the mixture onto it and bake for 10-15 minutes until golden. Dust a separate sheet of greaseproof with sugar, then turn the sponge out onto it and leave to cool.

When cool, mix the ricotta with the orange zest and icing sugar. Spread over the sponge and top with the pieces of rhubarb. If there's any ricotta left, serve it on the side.

Now, using the greaseproof to help you, roll up the roulade as tightly as possible. It may crack, but this doesn't matter too much. Sprinkle with icing sugar and decorate with mint sprigs, then slice with a sharp serrated knife to serve.


My debut as a published food writer

Well, aside from this blog, of course. Click here to read my article for lovefood.com about pigs' cheeks. It's rather exciting seeing your name in print, especially sitting proudly atop a large photo of a pig's face. What more could a girl want?

(Actually, now I think about it, it's not really my debut. I'm rather proud of this article on British food history, or this one on a delicious brand of 'healthy' chocolate called Nibchoc - Oxonians, I believe they sell it at Woodstock Road deli, and I'd recommend it highly.)


Spaghetti with razor clams


The first time I ate these rather space-age-looking shellfish was overlooking a marina in La Rochelle. We were lunching at a 'seafood shack', one of several small huts by the water that served fresh seafood, simply cooked. There was no menu, just a chalkboard over the serving counter with the names of various forms of fish and shellfish. We ordered most of the things on offer, sat on plastic tables with paper napkins, and devoured an array of delicious fruits de mer. I remember mussels, steamed in a foil parcel with white wine, butter and herbs, grilled sardines, fried squid rings, and a big platter of oysters with lemon. I also remember my first razor clam: I'd seen them at the fishmongers before, but had never bought them because I had no idea what to do with them. They were soft and slightly salty, like very delicate mussel meat. When I found a tasty-looking recipe in one of my new cookbooks recently, I decided to have a go at cooking them myself.


The book in question is Cooking with the Master Chef by Michel Roux Jr. I think he's great. I've watched him on Masterchef: The Professionals and also on the new BBC Great British Food Revival (more on that another time - it's a brilliant programme and I recommend you all watch it). I love his passion for good cooking and good ingredients, and also his genuine care for the industry and the people who work in it. I also never cease to be amazed by the fact that a self-professed Frenchman can possess an accent more English than the Queen. This recipe book is great because it takes the classic French haute cuisine techniques that are Roux's heritage, but uses them to make dishes easy to recreate at home. The result is a collection of recipes that are simple, but possess a certain je ne sais quoi that elevate them from weekday meals to dinner party fare. The recipe for spaghetti with razor clams is one of the simpler dishes.


So, after a period of sadness in which I continually visited the fishmonger, buoyed with excitement, only to find razor clams distinctly lacking in their display, I was in luck: several large bundles of brown, shiny clam shells stood on the counter, wrapped with elastic bands. What is odd about razor clams is that, unlike mussels and normal clams, you can actually see the meat inside: the white clam will protrude out of its shell and wave around in the air. It's utterly bizarre to watch, and what's even funnier is when you poke the protruding clam meat, and it retreats into its shell with a sort of sucking sound. A bit like if you poke a snail. I stood there for a while, fascinated by these alien-like tentacles waving around. One of the fishmongers came along and poked them. I imagine it's probably one of the highlights of their day - it certainly would be for me if I worked there, but I do take a childish delight in such things.

The downside to the distinct liveliness of these clams I discovered later. I rinsed them thoroughly in cold water before cooking to remove any grit. The clams, in retaliation, squirted all the water back into my face as I carried them over to the pan. It was as if they could sense their impending doom. Into the pan they went, with some shallots, white wine, and olive oil, and the lid went on to steam them for a minute or so. They open much more quickly than mussels and are easier to overcook. After that came the laborious task of extracting the intestine (a bit like the black vein down the back of a prawn). You're left with very little meat, considering how large the bundle of clams is initially (this recipe uses a kilo).


The cooking juice from the clams goes in a pan with some parsley, chopped chilli and garlic, and reduces until it forms a sauce for the pasta. After that, it's as simple as draining the spaghetti, tossing it in the sauce, adding the clam meat, heating through and serving with some more parsley. It's delicious: rich and salty from the wine and the clam juices, with lovely little nuggets of flavoursome clam meat. You could also make it with mussels or regular clams if you can't find the razor variety (and to be honest, it would be a lot less faff, given the painstaking task of extracting the intestines). I've adapted the lovely Michel's recipe a bit, to include more garlic and more spaghetti (he suggests 300g for four people, which is fine as a starter, but you need more for a main course, especially as there's no filling sauce to go with it).

Spaghetti with razor clams, parsley and garlic (serves 4):

1kg fresh live razor clams (store in the fridge wrapped in damp newspaper until ready to use)
2 shallots, finely chopped
4 tbsp olive oil
200ml dry white wine
450g dried spaghetti
6 tbsp chopped flat-leaf parsley
4 garlic cloves, finely chopped
1/2 red chilli, finely chopped
Salt and pepper

Rinse the razor clams in cold water (wear an apron - they will spit it back at you!) Sauté the shallots in a little of the oil until soft. Add the clams, turn the heat up, then pour in the wine. Put the lid on, shake the pan, and after a minute or so check the clams - when they've opened, they're ready, and they overcook very quickly. Drain the clams, reserving the cooking liquid (return this to the pan).

Pick the clam meat out of the shell and remove the sand bag/intestine at the bottom. Chop the clams into short lengths.

Put the pasta on to boil while you finish off the sauce.

Boil the cooking juices until reduced by half, then add most of the parsley, the olive oil, garlic and chilli to taste. Season and add the clam meat. Drain the pasta, reserving a little of the water, and add to the clam sauce. Toss well, adding a bit more pasta water to loosen if you need to. Garnish with the rest of the parsley, and serve.

(Adapted from Cooking with the Master Chef, by Michel Roux Jr.)

Seared venison, kumquat compote, beetroot and savoy cabbage

"The venison first shall be the lord o' the feast; To him the other two shall minister" ~ Shakespeare, Cymbeline


Sometimes you can't beat a good piece of red meat, seared in a blisteringly hot pan on the outside until it scorches, left to rest for a few minutes and then sliced open to reveal a perfectly pink interior glistening with moisture. Even better when the red meat in question is one that is good for you, amidst all the headlines about red meat being linked to bowel cancer. Venison is I suppose what you would call red meat (though actually, it's almost more of a very dark purple), but it is low in saturated fat, high in iron and vitamins, and very low in cholesterol. What's more, it has the succulence of (beef) fillet steak but rather more flavour. There's also the notion of grandeur about it: 'venison' to me conjures up images of grand Tudor feasts, servants carrying home the spoils of one of Henry VIII's (pre-leg ulcer) hunting trips, huge deer carcasses draped over their shoulders.


I normally cook venison with some sort of red wine jus, with a little redcurrant jelly and something like whole redcurrants or blueberries added. I've also made it with a quince and rosemary compote, which was absolutely delicious. However, I'm always in search of new and exciting meat and fruit pairings, and I vaguely recalled a recipe I read somewhere that mentioned a kumquat compote. Off to the market I went, to procure some venison and kumquats.


They're a funny little fruit. A member of the citrus family, the skin and pith are sweet while the inside is quite sour - kind of the reverse of an orange. I nibbled a whole one, and it was pleasantly refreshing, but I'm not sure I could sit there and eat them raw from the bag. So I cooked them with fresh ginger, shallots, cinnamon, cumin, brown sugar and vinegar to form a beautiful orange compote, thick and jammy with whole pieces of kumquat that had a crunch rather like the peel you find in thick-cut marmalade. It's hard to describe the taste of the compote: it has a lot of sharpness from the vinegar, but that is matched by the sugar, and you end up with something very sweet and very moreish. It works perfectly with the iron-rich gameyness of the meat, though I'd actually eat it as it is on porridge, or with ice cream. 


To accompany the venison, some of my favourite winter vegetables: mash, roasted beetroot, and savoy cabbage. I absolutely adore cabbage - braised red cabbage is probably my favourite, but I have a new love for savoy. When lightly steamed, its leaves have so much texture and a hint of bitterness that makes them a perfect match for rich-flavoured meat dishes. They also provide a nice colour contrast on a plate that is predominantly dark purple. The beetroots I just roasted in foil in the oven. I actually intended to mash them with the potato, but they don't mash particularly well, so I ended up serving them in chunks. They gave a new textural dimension to the dish, which is otherwise rather soft.


As for the venison, I left it to marinate in red wine, juniper, bay, thyme, rosemary and garlic for half a day before drying it and searing it in a hot pan for a couple of minutes on each side. I also left it to rest for about ten minutes under some foil while I made the mash - this does make a real difference. It means that the juices don't trickle out of the meat when you cut into it and make a mess of the plate, and it makes the meat a lot more succulent.


This is a dish I'm rather proud of; all the individual elements work very well together, and the kumquat compote is just wonderful. I'd make double and save some for dessert one day, if I were you - sadly I didn't have the foresight. But I think this is just what you need when those cravings for a good old-fashioned plate of meat and vegetables arises. If I owned a gastropub, it'd be there on my menu without a doubt (one can dream...).


Seared venison, kumquat compote, beetroot and savoy cabbage (serves 4):

4 venison steaks (or 2 large ones - you want a total weight of about 800-900g)
Large glass of red wine
6 juniper berries, crushed
2 garlic cloves, crushed
2 sprigs thyme and rosemary (or 1tsp dried thyme and 1tsp dried rosemary)
2 bay leaves

200g kumquats, quartered lengthways
1 inch piece fresh ginger, peeled and finely diced
2 shallots, peeled and finely diced
1/2 tsp ground cinnamon
1/4 tsp ground cumin
75ml white wine vinegar
40g light muscovado sugar

4 baking potatoes, peeled and cut into four
2 large beetroot, scrubbed but not peeled
1/2 savoy cabbage
Olive oil
Butter
A dash of milk
Salt and pepper

Marinate the venison steaks in the wine and aromatics for at least an hour before you plan to cook it. When you are ready to cook, remove from the marinade (reserve it) and dry the steaks thoroughly with kitchen paper before seasoning them.

Roast the beetroots at 200C, wrapped in foil, until tender. (If they take forever, cut them into smaller pieces - some of the colour will run out, but it doesn't really matter).

For the compote, fry the ginger and shallot in a little oil until softened. Add the spices and the kumquats, and cook until the fruit has softened slightly. Then pour in the sugar and vinegar, cover with a lid and leave to simmer until the fruit has softened even more. Remove the lid and reduce until you have a thick, jammy consistency. Taste - you might need to add a little more sugar.

For the mash, boil the potatoes until soft. Drain and leave to dry out for a few minutes before mashing or pushing through a potato ricer. Stir in seasoning to taste, along with butter and milk.

When the mash is done, keep it warm while you cook the venison. Heat some oil in a large saucepan until quite hot - you want the steaks to sizzle as soon as they hit the pan. Place the steaks in the pan and cook for a couple of minutes on each side (this is for rare meat - you can cook it more if you like, but venison should ideally be served rare as it toughens very quickly). Put on a plate and cover with foil while you cook the cabbage and make the jus.

For the jus, strain the venison marinade and pour into the hot pan you cooked the steaks in - it should bubble and reduce to about 6tbsp of liquid. Taste and check the seasoning.

For the cabbage, finely shred the leaves, heat a little oil in a large saucepan with a lid and stir fry for a few minutes. Add about a centimetre of water, put the lid on, and leave to steam until tender but still crunchy. Check the water level sporadically to make sure it doesn't boil dry. Season and stir through some butter before serving.

To serve, place the mash on the plate and surround with beetroot and cabbage. Slice the venison steaks into thin strips and place on top, drizzle over some jus, then top with the compote.